Pages

Monday, July 30, 2012

Migrating Site From SharePoint 2010 to SharePoint 2013

This is a quick overview about Migrating SharePoint 2010 site to SharePoint 2013 environment.
There is nothing special about this particular migration , everything remains the same as we moved sites from MOSS 2007 to SharePoint 2010, however in my case I faced few issues after migrating to SP2013 because default is claims in SharePoint 2013 and site on SP2010 was using NTLM authentication. we will see this in details later section of this post.

Lets see step by step procedure to migrate a default SharePoint 2010 team site to SharePoint 2013 by database attach method. our SP2010 team site has a custom web part on its home page. the web part is populated by deploying a farm solution on SP2010 server.

First thing first -
Create new web application - create a new web application on on SP2013 server where we will be creating the migrated site. do not create the site collection on it as attaching the content database is going to avail the sites on created web application.

Deploy Farm Solution (if any) - in our case we have the farm solution deployed to SP2010 environment so lets go ahead and deploy the same farm solution to the new SP2013 environment. this is just to make sure that you have all your custom SharePoint components and assemblies present in the new environment.


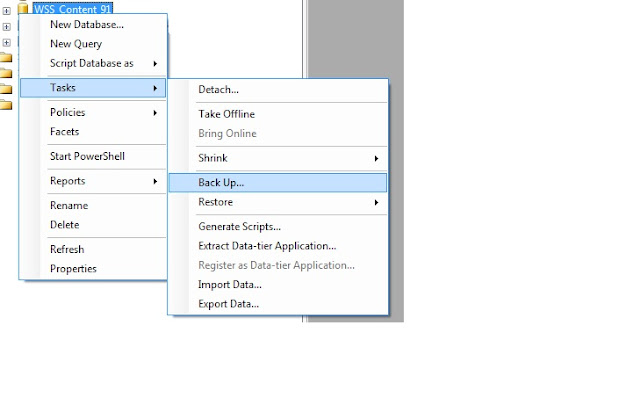
Backup and Restore SQL db - next thing , open up the SQL Server management studio on SP 2010 environment, find your site db and perform a backup operation. this is pretty simple using SQL Server management studio and with a few clicks you can get backed up db file on file system. after this copy the back up file to SP2013 server and paste on file system.
Now again open up SQL server management studio in new environment and restore the database by creating a new database.


Test Database - once the database is restored on the new environment - perform a following check on db. this is just to make sure that the new environment has all needed components that the old SP2010 site is using. you can do this using powershell command - Test-SPContentDatabase


as you can see above - after running this command even thought I didnt get any error message - I got message which says something about authentication part. this is because the site we are trying to migrate is using classic windows authentication however in new SP 2013 - default is claims. lets ignore this message for now and lets go ahead and attach this database to new web application on SP2013.

Attach Database  - now as we are set to attach the database to the newly created web application on SP2013 , lets run the command which perform this operation for you. Its a powershell command - Mount-SPContentDatabase
Please note that this command takes few minutes to perform the required operation.


Browse the site - once this is done - open up the central administration and change the site collection administrator of new site. This is needed to be done when you are working with two different farms and domains are different.
After this try browsing the site - in my case I got few errors related to claims based authentication. but I used a workaround for this.

As the new environment needs claims and old site uses windows authentication - I disabled and enabled the claims authentication on new web application using powershell command like this

$objWeb = Get-SPWebApplication http://yourwebapplication
$objWeb.UseClaimsAuthentication=0
$objWeb.Update()

and now enable claims authentication again
$objWeb = Get-SPWebApplication http://yourwebapplication
$objWeb.UseClaimsAuthentication=1
$objWeb.Update()

 above workaround worked in my case and I was able browse the site.


If you observe at the top - SharePoint suggests to upgrade the look and fill to SP15. so lets click on start now - it launches a page where you can check the overall progress.


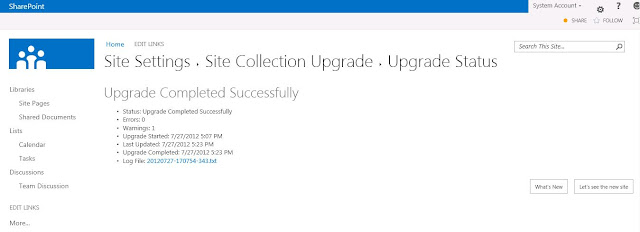
Once this all is done - visit the site and check the modified look. you can even see the custom web part on new site page.


Sunday, July 29, 2012

SPD Workflow Error Solved : cannot perform this operation, the file is no longer checked out or has been deleted

After long chase behind this issue finally I figured out the solution.

Issue : You create a new workflow using SharePoint designer and publish it. but suddenly notice that the workflow status says - Failed to start. after further research on buddy Google you know that there are some files which are not checked in which are causing workflow not to start. (Reference - Here)
You again go to SPD and see - oh yes , why these xoml and xsn files are still checked out? never mind , you go ahead and tries to check in the files. but what?? you gets an error message - cannot perform this operation, the file is no longer checked out or has been deleted. and you wonder why??

Solution :
There are couple of solutions which I found over the web , so I will mention all of them and the one which worked for me.(which I had to figure out).

  • Clear SharePoint Designer Cache - There are already many articles on this.you can refer Here.
  • Check Alternate Access Mapping - Many blogs said that one should check the AAM on the server for your site collection. but for my case this was not possible as I was working on SharePoint Online. Reference Here.
  •  Check the required fields -
 I will discuss more about the last approach which worked for me.

[Update]: Note that below approach was verified with SharePoint 2010, however for similar issues of SP 2013 and workaround for the same - please take a look at comments section.

When you create a new SharePoint workflow using SPD , it gets stored in to the hidden document library in site - known as Workflows. This library is similar to other document libraries in SharePoint which has many fields to store metadata. Whenever you create new workflow , there are some files which gets created - like xoml , config and xsn. by default - the "Name" column in initiated with the file name but Title remains empty.
In my case - Title column was  marked as "Required". and this was the reason SPD was throwing an error as it was not able to find the Title field value before checking in. but the Error message was kind of generic one.

Solution was simple - make the Title column in the workflow library optional. but how to do that ? as workflow library is hidden.
Well that's simple -(steps mentioned are for SharePoint Designer 2010)

  1. Open SharePoint Designer.
  2.  Select All files from left navigation. select workflows and go to properties. (right click workflows > properties) , and you will see workflow list settings.
  3. In this window - find customization section and click on Edit list columns.
  4. Make sure that the Title column is set as optional. If it is required - right click > column settings > and check allow blank values > click ok and save.
  5. and you are done. now you should be able to check in workflow files.

I hope this helps someone. Happy Coding.. :)


Tuesday, July 24, 2012

Metadata Navigation in SharePoint 2013

This time post is about exciting taxonomy navigation feature in SharePoint2013. by now we all know that Managed Metadata / Taxonomy is feature introduced with SharePoint 2010 and got huge fan base. however there was always need to have the terms used in the site navigation and for that nothing was given by SharePoint as out of the box , so developer guys needed to write some code to get the terms in the navigation.

Now SharePoint 2013 has come up with the awesome feature called as metadata navigation , which is in short having your taxonomy terms in your custom navigation for site with more friendly way. lets take a look how

I am using Office365 preview and created a brand new publishing site. as usual - go to the site settings page and under look and feel you will be able to see a link which says - Navigation. click on it and you will be redirected to the site navigation settings page which looks like this

you will be able to see the added radio buttons in the Global and current navigation settings of site. under which another extra setting exists which asks you to select the term set which you want to use as metadata navigation provider. meaning that terms under this term set will appear in the navigation. all right lets create a term set using traditional link under site management - Term Store Management.

I have created the Term Set name News which contains some terms which will appear in site navigation.

Note that If you want to create your own term set and you expect that the terms under this term set should appear in the navigation - then you should do following setting
Create your term set- after creation - go to the Intended use tab - and check the checkbox which says use this term set for site navigation.


Now click on the individual term and again check the settings available in tab appearing at the top of details pane.
the most awesome thing about this feature is - you can configure the term navigation as the way you want using these settings - like

Node Name - Name of the node in the navigation
Hover Text - Hover text on mouse hover of node
Menu visibility - Specify whether this node should appear in which navigation menu
Link to header - you can provide your custom link location for header
Term Driven Page - If you do not provide the custom link location for header then on click of node , you will be redirected to user friendly url like - http://yoursite/subsite/energy


and few more settings in

Friendly URL customization - you can customize the friendly url of term
Target page settings - you can mention the page page which will be loaded when you click on term in navigation and navigate to the friendly url , example I have created a Energy.aspx page in the Pages library of the site and mentioned url of this page.
SEO Settings - you can even configure the search engine optimization related settings for individual term navigation node.


Once this all is done - again navigate to the Site Settings > Navigation page and under term set selection select the term set which you just created , click ok and you should be able to see your metadata navigation.


observe the urls , you can now go ahead and play around more settings of this nice feature. enjoy..

Saturday, July 21, 2012

Office365 Preview Development - Using Visual Studio

..continuing with the Office365 preview and development one of the most anticipated and my favorite feature is given by Visual Studio 2012, what is that? lets see

looking back at SharePoint 2010 and Visual Studio 2010 days - we were able to create the SharePoint projects using built in project templates given by VS for SP 2010 - but the disadvantage of using this project template was we had to install on the SharePoint on machine itself, we couldn't just create the wsp project on local machine with VS 2010 installed and then deploy the wsp to the server.

So whats new now?
Well with the visual studio 2012 RC - there is enhancement done for those who deal with Office365 / SharePoint 2013.  we can create a app project and deploy it on the OnPremise or on cloud SharePoint directly. just need to mention the site URL and we are done. visual studio takes care of deploying and installing the app package for you.

Once you install Visual Studio 2012 RC on your machine - install the Office Project Templates using this link. (download the tools under tools section). after this is done - you will be able to see the SharePoint project templates in VS 2012 RC.

Lets create a sample app project and deploy it directly on Office365 preview SharePoint site.


 Click ok, next step is to enter name URL of SharePoint site on which you want to deploy this app. now interesting point here is you can either add the url of your on premise SharePoint server site or add url of your Office365 site.


again - it asks you to select the type of deployment of your app. there are two types of SharePoint app deployment.

1. SharePoint Hosted - everything remains in SharePoint , complete code runs on client.
2. Cloud Hosted  - when app contains some server side code the this deployment type is selected.
     this is again subdivided into two types
         a. Developer hosted - app developer should bring his own deployment infrastructure.
         b. Auto hosted - SharePoint takes care of deployment of package itself.
For more information - please take care of great video series by Andrew connel here.

we will select the SharePoint hosted app and click finish. VS 2012 RC opens up app editor.
Lets take a closer look at solution explorer which looks like this


Feature - a default feature which takes care of provisioning app entities to SharePoint
Content - application css file
Images - app image
Pages - application's default landing page
Scripts - application js file - all JavaScript files undergo this folder.

There is AppManifest.xml which contains app settings such as


App Title , Name , App Icon and App Default start page

Permission Request - If there are certain resources of the site collection / service applications needs to be accessed by the app - it should be mentioned in the permission requests , when app will be installed - a permission request will be made by the app to the user.

Feature Prerequisites - If app required certain feature of the web to be activated before its use then it is mentioned in feature prerequisites.


when this app is run - you should see welcome message - displaying this welcome message is handled in a js file where ECMA script / JSOM for SharePoint is used to retrieve the user name of the current user.


You can add / modify the js as you wish and can start building and deploying your app on your office365 preview site.

Have fun.


Thursday, July 19, 2012

Future of Office365 Development - Napa

After release of consumer preview of SharePoint 2013, some of us were quick enough to get on installing bits , however as a quick process to see the feature set included in latest version of SharePoint some folks went directly to the Office365 preview which has SharePoint2013 and Office2013 services.

As everybody seems to take more interest in apps in SharePoint 2013 , Microsoft is kind enough to publish a app called as Napa for developers, using Napa custom apps can be created. interesting ? lets see how

If you are also one of those who are interested to take a look at Office365 preview - you can get yourself here and sign up. once you do that you will be given a admin console for office365 preview. something like this


wait for sometime as Office365 provisions a team site for you -once this is done go ahead and visit the SharePoint site , it will be something like this.


Notices dome changes ? oh yes SharePoint has gone Metro. everything is app in SharePoint now. why did I say that? take a look here and you will agree


noticed the change? the create button is replaced by add an app.
coming back to the original post topic point , what is and where is Napa?
Lets create a developer site using Office365 admin console, developer site is special site template given by SharePoint.
once it is created - browse the site - go to view all site content and click on add an app. once you click on this option you will be navigated to the app store. on left navigation you will see SharePoint store. click on it and you will be navigated to this page


go ahead and Napa app to your site. once you add the Napa app to your site , you will see the link to Napa in left navigation of your developer site. click on it to get started developing your app.
we will create a SharePoint App and will call it as HelloWorld App


after click on create button , Napa creates a basic project schema for you in browser based editor. If you observe ,In content folder it creates application specific css file, then it creates a Default.aspx page in pages folder which will be home page for your app, in Images folder you can add images needed for your app and in scripts folder you will be able to add the scripts needed to be included in your site.


so first lets simply try to run the app , Napa editor first packages the app , installs the app to your developer site and launches it for you. without writing a single line of code - running app looks something like this


You can go ahead and do your custom SP coding using ECMA and apply your own styles.
have fun..